I designed a quilt block for Fabric Spark's community quilt project celebrating their 5th anniversary on the Danforth. You can contribute a block and help grow the quilt!
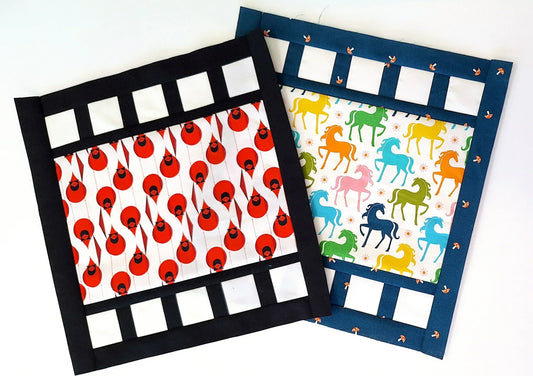
Introducing the Film Strip quilt block. The block was designed to give you room to express your creativity and celebrate your favourite thing about Canada (those cardinals might be the thing for you birdwatchers). The centre rectangle is yours to discover...
There has never been a better time to celebrate our beautiful country. You might want to appliqué your favourite outdoor hangout, choose a fabric that is symbolic of your favourite Canadian artist or band, or maybe embroider a special message celebrating our diverse community. Help us tell our story about all the amazing things that Canada represents!
When you're finished you can drop off your completed block(s) at the store or mail it to us (1992 Danforth Ave.). We're hoping to collect them all by July 1st - Canada Day! We will turn all of your blocks into a finished quilt for Friends of Ruby's residential facility. In one project, our community will be celebrating Canada, and providing warmth and comfort to 2SLGBTQIA+ youth when they need it most.
About the Film Strip Quilt Block
The pattern includes two construction methods: foundation paper piecing and traditional piecing. Choose the method that you’re most comfortable with. If you’re a bit adventurous and want to experiment with FPP, you can find a step-by-step photo tutorial below to guide you.
Download the Free Film Strip Block Pattern
Film Strip quilt block pattern is available here.
About this FPP Photo Tutorial
This tutorial will demonstrate how to complete template A of the Film Strip quilt block pattern. The pattern includes the foundation paper piecing (FPP) template you’ll require for this tutorial. If you prefer, you can follow the traditional piecing instructions included on the third page of the pattern.
Fabric Requirements for the Film Strip Quilt Block
Please refer to the pattern for fabric requirements.
Supplies
- Paper (copy paper, newsprint, or specialty FPP paper)
- Access to a printer or copier
- Ruler with 1" markings
- Craft or paper scissors
- Glue stick or tape
- Pen or pencil
- Add-a-Quarter Ruler (optional)
- Sewing machine
- Cutting mat and rotary cutter
- Thread (Aurifil)
- Iron or seam roller
- Pins
How to Foundation Paper Piece the Film Strip Quilt Block
The following steps will demonstrate how to paper piece your template from printing to trimming.
Step 1: Print and Cut-Out Template A
Printing and preparing your template is an important step.
You can read more on what to look for when printing templates, and how to prepare them to minimize any chances of errors when piecing here, but I've summarized it for you below, too. Browse the photos for visuals of each step.
- Print two copies of template A.
- The printer setting should be set to 100% scale or actual size.
- Confirm that the 1" test square measures correctly. Adjust the scaling percentage, if needed.
- Cut out each template leaving 1/8" of excess around the dashed border. Leave about ¼” of excess along the edge that is to be joined.
- Glue or tape the sections of template A together as noted.


Step 2: Preparing Your Fabrics
For the film strip quilt block, I recommend you cut a 2.25” strip from your dark fabric yardage and your light fabric yardage to start. If you would like to give yourself a greater margin for error you can increase this to 2.5”.

We will be cutting the fabric as we go, rather than cutting individual pieces for each section. You can use an assortment of scraps as well, but be sure that the scraps still read as darks and lights, because contrast is important for the design.
Keep in mind that, unlike other patchwork techniques, your fabric pieces don't have to be perfectly accurate. We’ll be trimming them to the required size in later steps.
Step 3: Pre-fold Template A Along the First Sewline
The sections are identified by the number within each shape. The shape with the number 1 is the first section, the shape with the number 2 is the second section, and so on. This will be the order in which we attach fabric pieces to the template.
Place the tapered edge of your Add-a-Quarter ruler (or the edge of a piece of cardstock) along the solid line between sections A1 and A2 of the template. Fold the template toward the hard edge and press to create a crease.


Step 4: Place your Fabric Pieces
Place your light and dark fabric strips right sides together.

With the template folded along the crease, place section A1 on top of the light fabric strip (the dark fabric strip is at the very bottom). Estimate about ¼” of excess fabric above the folded edge. Flip open the template and pin everything in place (note that there should not be more than 1/4" above section 1).


Step 5: Stitch Along the First Sewline
Adjust the stitch length on your sewing machine to 1.5 mm. A small stitch length will help to perforate the paper template and ensure that your stitch will not be compromised when tearing out the paper.

Sew along the first sewline (a few stitches into the next section is fine). You don't need to backstitch.

Flip your template back. If the excess fabric above the fold is more than ¼” use your ruler to trim it down.

Step 6: Press Fabrics Open
With the template right side down, flip open the dark fabric strip. Confirm that it covers the entirety of section 2 plus 1/4" of excess around the section's perimeter.

Using a seam roller or an iron to press the fabric piece open.

Trim the light fabric beyond the template as shown below, so that it can be used in the next step.

Step 7: Pre-fold Along the Second Sewline
With the template right side up (your fabrics should still be pressed open underneath the template), place the tapered edge of your Add-a-Quarter ruler along the solid line between sections A2 and A3 of the template. Fold the template toward the hard edge and press to crease.


Step 8: Prepare the Seam Allowance
With the template folded along the second sewline, place your Add-a-Quarter ruler so that it sits on the folded edge of the template. (When the ruler is nesting on the fold, it measures exactly 1/4" above the fold. You can align the folded edge with the 1/4" marking on any ruler if you don’t own the Add-a-Quarter.)
Use a rotary cutter to trim the fabric above the fold.

Step 9: Place the Third Fabric Piece
The third fabric piece to be placed is for section A3. Section A3 of the template requires a light fabric piece.
With your template folded along the second sewline, place the light fabric strip under the template by matching the raw edges of the prepared seam allowance. Flip open the template and pin the fabrics in place.

Step 10: Stitch Along Sewline 2
Stitch along the solid line between sections A2 and A3. (Note there should not be more than 1/4" of fabric above section 2).

Step 11: Press Fabrics Open
With the template right side down, flip open the light fabric strip. Confirm that it covers the entirety of section 3 plus 1/4" of excess around its perimeter.
Using a seam roller or iron to press the fabric piece open.

TIP: Avoiding shadowing (seeing the dark fabric behind the light fabric) by trimming down your dark fabric's seam allowance so that it is smaller than the light fabric seam allowance as shown below.

Step 12: Complete the Remaining Sections of Template A
Now we're getting into a rhythm! Follow the simplified steps below to complete the remaining sections of Template A.
- Pre-fold the template along the next sewline.
- Prepare your seam allowance above the fold.
- Place your dark fabric piece by matching the raw edges of the prepared seam allowance. Pin in place.
- Stitch along the sewline.
- Press fabrics open.
Completing Sections 10 and 11
Sections 10 and 11 are completed the same way as the other sections. They are just longer and will require a long piece of dark fabric and more pins to hold the fabric in place. Follow the steps above to complete.


Your template will look like the photo below once all the sections have been completed:


Step 13: Trimming Template A
Once you’ve completed all of the sections on Template A you can trim it to size. To do this, align the 1/4" line on any ruler with the solid line alone one edge of the template.
Using a rotary cutter, trim along the edge of the ruler (which will automatically line up with the dashed outer border of the template).
Do this for each side of the template.


Ta-da! You’ve completed the template! I recommend that you remove the paper before assembling the rest of your block. You can switch back to 2.0 or 2.5mm stitch length in this case.
Next Steps
You will require two of template A to complete the film strip block pattern. Use what you’ve learned above to make the second template. You’ll get the hang of this technique in no time!
Follow the “Assemble the Block” instructions to complete your quilt block.
Share your finished block on Instagram by using the hashtag #filmstripquiltblock. Tag @shipsandviolins and @fabricspark too!
If you're participating in Fabric Spark community quilt, please mail or drop off your quilt block at: 1992 Danforth Ave., East York, ON M4C 1J6, Toronto, ON, Canada. We will be accepting entries until July 1, 2025.