
Have you stumbled across a quilt pattern you'd love to make, but felt intimidated when you learned it was constructed using foundation paper piecing (FPP)? Did you take a workshop on FPP ages ago and aren't sure if you remember how to do it? You're not alone.
Whether you're a beginner to the technique or just need a refresher, this easy-to-follow step-by-step guide will support you in your piecing journey.
The first pattern I designed in 2018 was foundation paper pieced, and since then I've been working to build a simple way to explain the technique to other curious quilters.
The process can seem confusing at the start, but one of the key things to remember as you begin is: you don't have to guess whether your fabric placement will work. I'll show you how to eliminate guesswork and build a strategy that will have you falling for FPP.
Let's begin!
If you would prefer to watch a tutorial, you can do so via the Ships & Violins YouTube channel.
Step 1: Plan Your Quilt
Like any project, it's important to plan your approach. Read the pattern to learn if there are any fabric recommendations, including colour selections. Once you've decided on your fabrics, use a swatch card to stay organized
Step 2: Print and Cut-Out Templates
Printing and preparing your templates is an important step.
You can read more on what to look for when printing templates, and how to prepare them to minimize any chances for errors when piecing here, but I've summarized it for you below, too.
-
Print templates at 100% scale.

-
Confirm that the 1" test square measures correctly. Adjust scaling percentage, if needed.

-
Cut out each template leaving 1/8" of excess around the dashed border.

-
Glue or tape any templates that need to be joined.

-
Add notes to your templates (i.e. fabric colour), if you prefer.
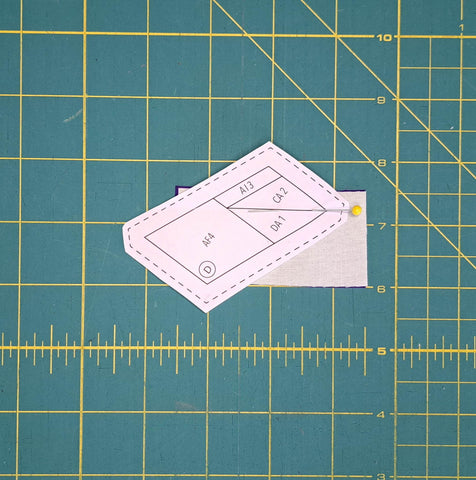
The tutorial will demonstrate how to complete template D (shown below) from The Square of Pegasus pattern.

Step 3: Preparing Your Fabrics
This step will depend on whether your pattern has included cutting instructions or not. Typically, designers will include instructions for simple FPP blocks that are repeated multiple times in a design. But as the designs become more complex, it's far simpler to skip the cutting instructions and cut-as-you-go.
For this tutorial I prepared the fabric as outlined in the cutting instructions of the TSOP pattern. You may choose to cut the fabric pieces as you need them, or you can cut all of the pieces at once. Be sure to label them accordingly.
Keep in mind that unlike other patchwork techniques your fabric pieces don't have to be perfectly accurate, because we'll be trimming them to the required size in later steps.
Alright, let's get piecing!
Step 4: Pre-fold the First Sewline
Place the tapered edge of your Add-a-Quarter ruler (or the edge of a piece of cardstock) along the solid line between sections 1 and 2 of the template. Fold the template toward the hard edge and press to create a crease.
The sections are identified by the number within each shape. The shape or section with the number 1 is the first section, the shape with the number 2 is the second section, and so on. This will be the order in which we attach our fabric pieces to the template.


Step 5: Place the First Fabric Piece
The first fabric piece to be placed is for section 1. Section 1 of the template requires a DA fabric piece.

Place the DA fabric piece under section 1 of the template with approximately 1/4" of fabric above crease we made in the earlier step. Confirm that there is at least 1/4" of fabric to the left, right, and bottom of section 1. Pin in place.
Important: The fabric piece should be right side down if you're using patterned fabric.

Step 6: Place the Second Fabric Piece
The second fabric piece to be placed is for section 2. Section 2 of the template requires a CA fabric piece.

With your template folded along the first sewline, place the CA fabric piece under the DA fabric piece, matching the raw edge above the fold.

Step 7: Test Your Placement
The most difficult part of FPP is visualizing how the fabric piece will cover its corresponding section, but it's important that you don't guess. Here's how you can feel confident in your placement before sewing a single stitch.
Pin your fabric pieces through the first sewline to simulate a stitch line.
Flip over your template.

Flip open your CA fabric piece.

Does the fabric piece cover the entirety of section 2 plus 1/4" of excess around its perimeter? Hold it up to a light source for better visibility.
If the answer is yes, then the fabric piece will do what we need it to do. If the answer is no, adjust the fabric piece so that it covers section 2 completely OR cut a larger piece of fabric and try again.
Once you're confident in the placement of your fabric, flip the template over and pin the template and fabric pieces together.

Important: Confirm that there is only 1/4" of each fabric above the fold like step 6.
Step 8: Stitch Along Sewline 1
Adjust the stitch length on your sewing machine to 1.5 mm. A small stitch length will help to perforate the paper template and ensure that your stitch will not be compromised when tearing out the paper.
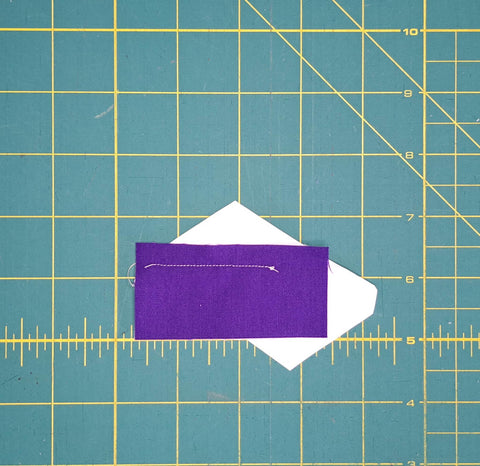
Sew along the first sewline. Begin a few stitches before sewline 3, stitch on top of sewline 1, and finish sewing in the seam allowance. You don't need to backstitch.

This is what the backside of the template should look like:
Step 9: Press Fabrics Open
With the template right side down, flip open the CA fabric piece (just as we did when we tested it earlier). Confirm that it covers the entirety of section 2 plus 1/4" of excess around its perimeter.
Using a seam roller or an iron, press the fabric piece open.

Step 10: Pre-fold the Second Sewline
With the template right side up, place the tapered edge of your Add-a-Quarter ruler (or the edge of a piece of cardstock) along the sold line between sections 2 and 3 of the template. Fold the template toward the hard edge and press to create a crease.

Step 11: Prepare Your Seam Allowance
With the template folded along the second sewline, place your Add-a-Quarter so that it sits on the folded edge of the template. When the ruler is nesting on the fold, it measures exactly 1/4" above the fold.

Use a rotary cutter to trim the fabric above the fold. Place the offcuts aside.

A quick explanation: We completed a similar step for sections 1 and 2, but we estimated the 1/4" seam allowance above the fold, instead of trimming one. This is possible only when completing sections 1 and 2 of a template. For all the remaining sections, you will need to prepare your seam allowance.
Step 12: Place the Third Fabric Piece
The third fabric piece to be placed is for section 3. Section 3 of the template requires an Ai fabric piece.

With your template folded along the second sewline, place the Ai fabric piece under the template by matching the raw edges of the prepared seam allowance.

Step 13: Test Your Placement
Pin your fabric pieces through the second sewline to simulate a stitch line.

Flip over your template, and flip open your Ai fabric piece. Does the fabric piece cover the entirety of section 3 plus 1/4" of excess around its perimeter?
Once you're confident in the placement of your fabric, flip the template over and pin the template and fabric pieces together.

Don't forget: There should only 1/4" of each fabric above the fold like step 12.
Step 14: Stitch Along Sewline 2
Stitch along the solid line.

Step 15: Press Fabrics Open
With the template right side down, flip open the Ai fabric piece. Confirm that it covers the entirety of section 3 plus 1/4" of excess around its perimeter.
Using a seam roller or an iron, press the fabric piece open.

Step 16: Complete the Last Section
Now we're getting into a rhythm!
Let's complete the last section with a simpler set of steps:
-
Pre-fold the template along the third sewline.

-
Prepare your seam allowance above the fold.

-
Place your fourth fabric piece by matching the raw edges of the prepared seam allowance.

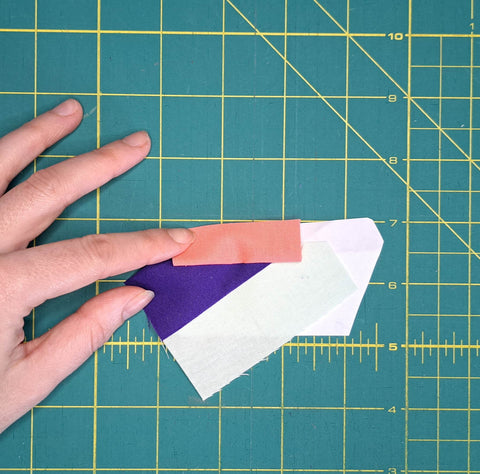
Important: The fourth section can be tricky. Make sure that you accommodate the entirety of the section, including the more severe angles.
In the photo above, you can see that the right bottom corner of the template (which is section 4) is not sitting on top of any fabric. If you were to test your placement, you'll find that a corner of section 4 won't be covered.
To fix this, move your template to the left until the folded portion of the template is sitting on top of fabric.

Confirm that there's fabric to the left of the template too.

- Test your placement before stitching.

-
Stitch along sewline 3.

-
Press your fabrics open.

Step 17: Trimming
Congratulations! You've pieced your first FPP template! But it still looks a little unusual, doesn't it? That's because we need to trim it to the exact shape of the template.
To do this, align the 1/4" line on any ruler with the solid line alone one edge of the template.

Using a rotary cutter, trim along the edge of the ruler (which will automatically line up with the dashed outer border of the template).
Do this for each side of the template.
Don't forget to trim off the corners, too - they'll be helpful during the assembly stage.

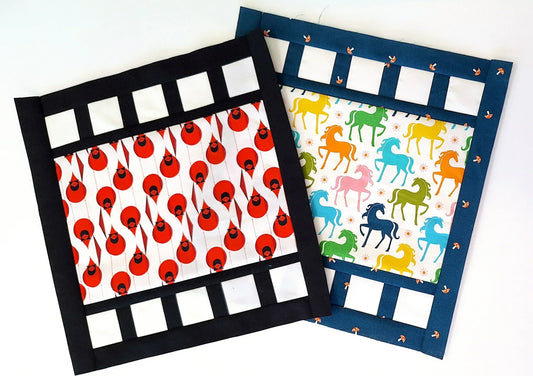
Celebrate!
Take a moment and enjoy the fruits of your labour!

You've completed your first foundation paper pieced template and, more importantly, you've learned the skills to tackle any FPP project of your choosing!
Repetition is the best teacher, so I encourage you to try another template. The steps will remain the same even if the template looks different. Take your time and always test your placement until you feel more confident in the technique.
When you've completed all of the templates in your pattern, you can begin to assembly. Here are 8 tips to help you assemble with success.
Did you find this tutorial helpful? Leave a comment below.


1 comment
Thank-you for the amazing tutorial! It gives me the courage to try _