
I'm excited to share a free star ornament tutorial for all of you holiday crafters out there!
This is a quick project that will improve your appliqué technique, and add a handmade touch to your Christmas tree. It's scrap friendly and a quick afternoon project that you can use year after year.
Enjoy and happy holidays!

Materials:
- two colours of felt (6" square of each)
- two star fabrics of your choice (3" square of each)
- one 5" square of backing fabric
- matching thread
- needle for hand sewing
- 7" piece of string
- zipper foot and patchwork foot
- fusible web
- glue stick
- a handful of polyfil stuffing (optional)
The ornament will finish at approximately 3 1/2" in diameter.
Step 1: Print one template page at 100% or actual size. You can download it here.

Step 2: Cut out templates A, B, and D along the outer border.

Step 3: Use template A to cut one circle out of your front felt piece and one circle of your backing fabric.
Step 4: Cut templates B and D out of the felt you'd like to use for your star.

Step 5: Trace templates C, E, and F onto the smooth side of your fusible web, and cut out with a rough 1/4" margin.
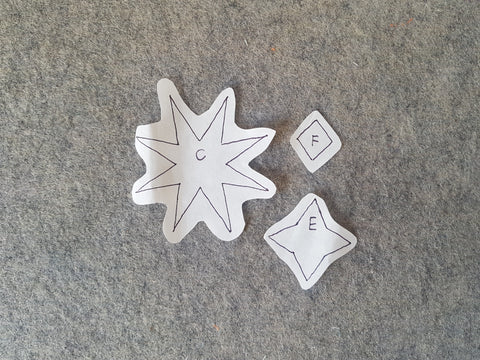
Step 6: Follow the manufacturer's directions to fuse templates C, E and F to the wrong side of your star fabrics.

Step 7: Cut out along the outer border.

Step 8: To determine the centre of the ornament, fold your front piece in half lengthwise and widthwise, pressing along the fold. Mark the centre intersection.


Step 9: Repeat step 8 to find the centre of B.
Step 10: Push a pin through the centre of B and your front piece (I accomplished this easily on my wool mat or ironing board). Apply a little glue to the corners of B to secure its placement. Remove the pin.

Step 11: Using a zipper foot, test your preferred appliqué stitch and size before beginning on your final project. I used a blanket stitch for this project, and changed my top thread each time I appliquéd a new piece.
Appliqué B to A using matching thread. Backstitch at the start and end. (Tip: save on your coloured thread by using your usual piecing thread in the bobbin).

Step 12: Remove the fusible backing from C, and centre it on the front piece as shown. Fuse C to B.


Step 13: Using the method in Step 11, appliqué C to the front piece.
Step 14: Centre D on the front piece as shown, and appliqué to attach.

Step 15: Centre E on the front piece as shown, and appliqué to attach.

Step 16: Centre F on the front piece as shown, and appliqué to attach.

Step 17: Place your front piece, right side facing up. Determine where you'd like the top of the ornament to be. Place the raw edge of the 7" string matching the raw edge of the ornament's top. The loop will be sandwiched between the front and back pieces. You can apply some glue to secure it in place.

Step 18: Place the backing, right side down, on top of your front piece.
Step 19: Mark a 2 1/2" gap on one side of the backing.
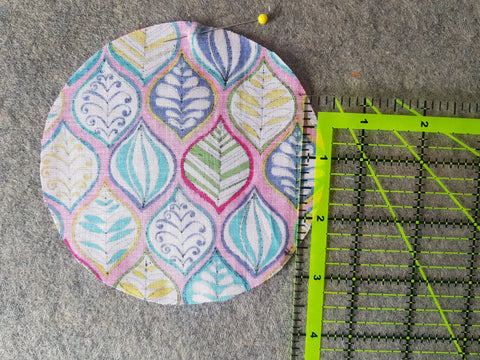
Step 20: Change your machine's foot to a patchwork foot. Sew the front and backs together using a 1/4", backstitching at both marks made in Step 19.

Step 21: Turn your ornament inside out through the 2 1/2" gap.
Step 22: Press along the edges to create a smooth circle.

Step 23: Stuff the ornament to your desire plushness. (You can skip this step if you prefer to have a flat piece or don't have any stuffing handy).

Step 24: Using a ladder stitch to hand sew the gap closed (here's a video tutorial on how to do a ladder stitch).


And there you have it!
Share your ornaments by tagging #shipsandviolins on Instagram!
