How to Digitally Colour Your Quilts with QuiltInk

Deciding on the fabrics for your next quilt project can be tricky, and if you're anything like me, you'll want to plan it out meticulously. That's why having the opportunity to digitally colour my quilt patterns has been an invaluable resource to my craft. As a designer, I have access to a variety of programs to help me plan my projects, but these options can be expensive and difficult to learn for the everyday quilter - especially when all you want to do is getting sewing!

Thankfully, we have some easier alternatives! Programs like PreQuilt, the Recolor App, and QuiltInk provide user-friendly experiences without a major learning curve to navigate. 

In this tutorial, I'll be showing you how to use QuiltInk, a free digital colouring service, to colour your own unique version of The Square of Pegasus pattern.

The written tutorial is comprehensive, but you can get the gist of how to use the program by viewing my video tutorial below.  

Video Tutorial On How to Use QuiltInk

Watch and listen to me work through this tutorial by visiting my YouTube Channel.


Getting Started with QuiltInk

Visit quiltink.com. You’ll have a few options from the homepage:

  1. You can Login if you have an account with QuiltInk. Note: You don’t need an account with QuiltInk to colour quilt patterns.

QuiltInk's homepage with the login button highlighted.

2. You can go directly to colouring quilt Patterns.

     QuiltInk's homepage with the patterns button highlighted.

    The benefits of creating an account are:

    1. It's a free digital colouring service.
    2. You’ll be able to save your mock-ups to your account. 
    3. You’ll be able to publish your mock-ups to the QuiltInk Wall. The Wall is a public library of mock-ups made by other users. You can find loads of inspiration there, as well as “love/like” your favourite ones (more on this later in the tutorial.)

    In this tutorial, we’ll be proceeding without logging into an account.

    Choosing a Quilt Pattern to Colour

    Click Patterns to begin. You’re now viewing QuiltInk's complete quilt pattern inventory. All the patterns you see on this page are available for digital colouring.

    It can be overwhelming to scroll through the complete list, especially if you’re looking for a specific pattern, so feel free to use the following tools to help narrow things down:

    1. Use the Magnifying Glass (Search) icon located at the top right corner of your screen to open a search bar. Type a pattern's name into the search bar. In this example, we’re looking for The Square of Pegasus. The pattern will be filtered out and easy to find. 

    QuiltInk's pattern page with the magnifying glass highlighted.

    2. You can also search patterns by designer, technique, and type. Click on the Tabs icon next to the Magnifying Glass (Search) icon to open a sub-menu with a list of options. Scroll until you find who or what you’re looking for, and select to filter.

    The pattern page on QuiltInk with the tabs icon highlighted.

    A list of designers featured on QuiltInk with Ships and Violins highlighted.

    Click on the pattern you’d like to digitally colour to continue. In this case, we're proceeding with The Square of Pegasus by me, Ships & Violins.

    A close-up of the search bar on the QuiltInk's pattern page highlighting the Square of Pegasus pattern.

    Selecting a Quilt Pattern Layout

    A sub-menu called Select a Layout will appear.

    QuiltInk's select a layout page for the square of pegasus quilt.

    This menu displays all the sizes and layouts that are available to colour. The Square of Pegasus offers the following layouts:

    • Single-Star Wall Hanging
    • 4-Star Wall Hanging
    • Single-Star Baby Quilt
    • 9-Star Throw Quilt

    Select the layout you would like to colour. For this tutorial, we will proceed with the Single-Star Wall Hanging layout. 

    Note: If you're not logged into an account, you will see a prompt stating that “you won’t be able to save your design.” Select OK to proceed or create an account if you would like the option to save.

    QuiltInk's prompt stating that you will not be able to save your mock-up because you are not logged in.

    How to Use QuiltInk's Colouring Editor Page

    You’re now viewing the editor page. This is where we can colour the design!

    Let’s start by learning about the various purple buttons you see along the bottom of your screen.

    Close-up of QuiltInk's undo, merge, unmerge, random colours and additional actions buttons.

    1. The Undo button. If you would like to undo an action at any point while in the editor page, click this button. Note: The button is greyed out and is not clickable because no actions have been taken yet. 

    2. The Random Colours button. Click on this button to have the software randomize the colours in the design.
    The software will pull from the colour palette that is currently active. The active colour palette is displayed on the bottom left corner, just above the colourful rows of dots.
    In this case, the Solids - Tula Pink palette is active, therefore the software will randomize the colours in the design using the 22 colours available in that palette.

    QuiltInk's Tula Pink Solids colour palette.

    Below are the first two mock-ups made by the software when I clicked this button twice. Note: Some of the mock-ups will be totally inspiring, while others may not work as well, so keep clicking until you love what you see!
        A mockup of the square of pegasus using the random colours button QuiltInk.     A mockup of the square of pegasus using the random colours button QuiltInk. 
    3. The Merge button. The mock-up provided by the designer is already merged, which means that all the sections with the same colour behave as one. The Square of Pegasus pattern was written using four colours, therefore you will see four colours when you select your layout. Colour this version if you would like to re-create the layout in the pattern.
    4. The Unmerge button. If you would prefer to experiment with different colour layouts, you can unmerge the sections and colour them individually. When you select unmerge, you will see a prompt stating that “all the pieces will be unmerged, and that you can merge them again” later, if you’d like. Select Unmerge to continue.
    Now you are able to click one the coloured dots available in your active colour palette, and colour the design piece by piece. Below you can see that I’ve coloured some of the sections that were once navy blue with pink.
    The square of pegasus mockup coloured using the unmerge setting on QuiltInk.
    If you would like to randomize the colours using this new colour layout, select the Merge button. Below is the first mock-up made by the software when I selected the Random Colours button after merging the new colour layout
    The square of pegasus mockup using the random colours options on QuiltInk.
    This is a great tool if you want to take more liberties with a quilt pattern, and make it truly unique!
    1. The Actions button. You will have three options available when you select this button:

    QuiltInk's more action button.

    • Show/hide stroke. A stroke is the line along the perimeter of a shape. The mock-ups automatically have a thin black line surrounding each of the shapes. If you would like to see the mock-up without the lines, select show/hide stroke. You can turn it back on at any time. Below is the design without strokes.
    The square of pegasus mockup on QuiltInk using the no stroke option.
    • Clear all colours. Select clear all colours, if you would like to remove all the colours from the design. You will have an illustration similar to a blank colour page, as shown below.
    The square of pegasus mock up on QuiltInk using the clear all colours option.
    • Revert to original. You can always return to the original layout design by selecting revert to original.

    Now, let’s move on to the purple buttons on the bottom right corner of your screen.

    Close up of QuiltInk's colour palette, colours used, and search by colours buttons.

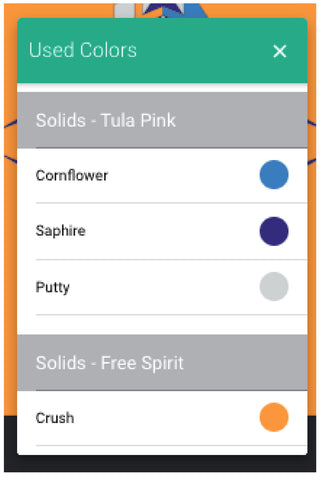
    6. The Palette button. Select this button to view a variety of colour palettes available for you to use. This can be a helpful option if your local quilt shop only sells a specific brand of solid fabrics. Limit the colour palette to their offerings, so that you can pick up the exact fabrics you’re looking for.

    QuiltInk's submenu allowing you to select a colour palette.

    When you select a palette, it will become the active palette. The active colour palette can be seen on the bottom left corner of the screen. Below we have the Solids - Tula Pink palette activated, and the active colour is Tula Pink (as shown in the black bar, and as highlighted by the black circle). Click on another colour to make it the active colour.
    Tula Pink Solids colour palette on QuiltInk.
    Each palette has a unique number of colours available. The Solids - Tula Pink collection has 22 colours, but the Kona Cotton – Robert Kaufman collection has 366! For collections with many colours, you will need to use the horizontal scroll bar to view all the colours.
    7. The Used Colours button. Select this button to view the colours that you have used in your mock-up. You can select one of those colours to make it active. Note: You can used multiple colours palettes in your mock-ups; you don’t have to limit yourself to a single brand. In the image below, the colours have been categorized by their respective brands.
    the square of pegasus mockup in QuiltInk using tula pink and free spirit colours.
    The used colours sub menu in QuiltInk.
    New active colour is Tula Pink's cornflower.
    8. The Search Colours button. If you are looking for a specific colour but don’t know the brand, use this search button to find it. Type in what you’re looking for, and you’ll be taken directly to it. You might find this handy if you’re working with fabrics that you already own, and you want to mock-up some designs using them.
    QuilInk's search by colour submenu.
    There are two more important buttons to note:
    QuiltInk's save and publish, and exporting buttons.
    9. The Save and Publish button. This button is only available if you are logged into an account. The following options will be available to you:
    QuiltInk saving mock-ups.
    You can choose to save your mock-ups to be viewed publicly (to the Wall) or privately. You can also save it as a draft, if you'd like to revisit it later.
    10. The Download Image button. You can export the information and/or an image of your mock-up at any time. When you select this button, a sub-menu will appear. You have two file formats to choose from:
    QuiltInk's exporting submenu.

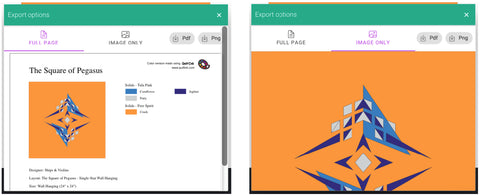
    Full Page. The full page option contains:

    • the name of the pattern
    • an image of your mock-up
    • additional details about the pattern (designer, size, and website)
    • a list of the colours used in the mock-up

    Export this version and take it to your local quilt shop to make sure you get the fabrics you need.

    Image Only. The image only options contains, well, the image only! Export this version to share your mock-up on social media or to feature it on your blog.

    You can export either option in two file formats: PDF (document/letter file) and/or PNG (image file). Exporting will commence as soon as you click either of these buttons. Note: Be sure to save the file where you can find it once it's been downloaded.

    In the top right-hand corner you’ll find three icons:

    QuiltInk's information, cart, and exit buttons.

    11. The Information icon. This will open a sub-menu with information about the pattern.
    12. The Cart icon. This will take you to the pattern’s product page for purchasing or more information.
    QuiltInk's information page on the square of pegasus quilt pattern.
    13. The Exit icon. Selecting this will take you back to the quilt pattern inventory page.


    A few more helpful tools include:

    • The Zoom In button. Use this button to zoom into a section of your mock-up. Note: Some designs will have very small sections that can be difficult to select if you do not zoom in.
    • The Zoom Out button. Use this to view the full scope of the mock-up.

    QuiltInk's Zoom in and zoom out options.

    • The Expand button. Select this button to return to the original view of the design.

    How to View QuiltInk's Wall of Mock-Ups

    When viewing the homepage and pattern inventory page, you’ll have a menu along the bottom of your screen. Select Wall to view mock-ups made by other QuiltInk users and designers. Click the heart icon associated with your favourite mock-up to let a user know you love their colour choices!

    QuiltInk's wall.

    You can filter the mock-ups using the search bar in the top right corner, too. Let’s see what mock-ups have been published for The Square of Pegasus.

    The square of pegasus mock-ups as featured on QuiltInk's Wall.

    Nice work everyone! If you would like to share your work with others, be sure to create an account.

    Tutorial Wrap-Up

    I hope that you’ve enjoyed this tutorial, and feel more at ease when selecting the colours for your future quilt projects.

    This tutorial was developed for the Ships & Violins sew along beginning February 6, 2023. Learn more about the event, including how to register, here.
     
    Did you find this tutorial helpful? Let us know in the comments below.


    Back to blog

    1 comment

    Very helpful!

    Carol

    Leave a comment

    Please note, comments need to be approved before they are published.

    Cristina De Miranda

    Cristina De Miranda has been crafting and creating since her early years watching Art Attack. A tactile world of colour, pattern, and design appeared before her when a colleague introduced her to quilting in 2018. Cristina quickly dusted off her sewing machine and dived into a plethora of designer fabrics. Today, she is totally and irreversibly immersed in a whimsical world called Ships & Violins.