
Patchwork is the exploration of a medley of geometric and organic shapes awaiting our playful eye. When I designed Fountain View, I used my graphic design software to create shapes that were a little unusual for patchwork.
I loved how the curves in Fountain View hinted at the floral and decorative elements that adorn classic stone fountains, but I didn't want to troubleshoot some way to piece the unique shapes into the quilt top, so I turned to appliqué to bring the design to life.
After completing Fountain View, I wanted to continue exploring the possibilities that each individual shape may have held. I chose the petal shape and began to copy, paste, rotate, and scale it until I landed on a design I wanted to use for an Aurifil Artisan challenge.
You can give my PinkBomb 88 project a try by following the step-by-step tutorial below, or browse the techniques to explore some shapes and patterns of your own.
How to Appliqué Your Own PinkBomb 88 Wall Quilt
Step 1: Download and Prepare Templates for Fusible Raw-Edge Appliqué
Print and follow the instructions on the template download to fuse and cut (16) petalette templates and (16) petalette-R(eversed) templates.
Step 2: Cut Your Fabrics and Batting
Cut a 33’’ x 33’’ square out of your quilt top fabric, batting, and backing fabric. I used a solid fabric for the quilt top, but you can also experiment with a patterned geometric fabric. It's best if the pattern can serve as a grid for plotting your petalettes in the next step.
For PinkBomb 88 I used Northcott's Color Works Solids in Jam n' Jelly.
Step 3: Make a Quilt Sandwich
Make a quilt sandwich by layering your backing (right side down), batting, and quilt top fabric (right side up) and basting together using a method of your choice.
Step 4: Quilt Using a Grid (Cross Hatch) Pattern
Quilt the sandwich using a 1’’ grid. You can use a ½’’ or ¼’’ grid, as well. It's important that the grid is consistent so that we can easily maintain symmetry when placing our templates.
For PinkBomb 88 I quilted my 1" grid using Aurifil Medium Orchid (2479) in 50wt.

Step 5: Place Your Appliqué Templates
Peel and place your first (2) petalettes and (2) petalettes-R 4" to 5" above the bottom of the quilt sandwich as shown below. Begin by placing the thin tips of two petalettes 1" inch apart as shown with the smaller circles. Place another set next to it. The sets should be about 1" inch apart as shown with the larger circle, and should be level as shown with the drawn line. You can pin the petalettes in place for the moment.

Step 6: Place Additional Appliqué Templates
Peel and place your next (2) petalettes and (2) petalettes-R as shown below. Begin by placing the large end of the petalettes 1" above the first set as shown with the smaller circles. The sets should still be about 1" above the previous sets as shown with the larger circle, and they should be level as shown with the drawn line. You can pin the petalettes in place for the moment.

Step 7: Continue Placing Appliqué Templates
Use the grid to place the remaining petalettes symmetrically. The petalettes should overlap to create a lattice effect as shown below.


Step 8: Confirm The Placement of Your "88" Appliqué
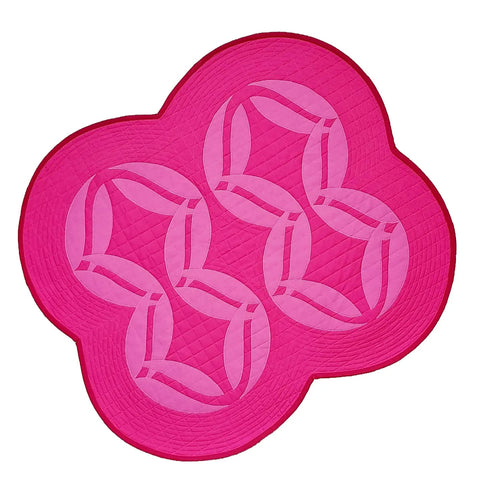
Continue placing the petalettes until you have made five overlapping circles or the number "88".
Feel free to adjust the placement of the petalettes to achieve more rounded shapes. Use the grid to help maintain symmetry across the quilt top.


Step 9: Iron Appliqué Templates in Place
Once you are pleased with the layout. Use an iron to secure the petalettes to the quilt top.
Step 10: Stitch Your Appliqué Templates in Place
Appliqué your petalettes in place using your preferred appliqué stitch.
For PinkBomb 88 I used a tight zigzag stitch in a matching 50wt Aurifil thread. If you want to add some pink threads to your collection, try Aurifil's Pink Land Iguana color set (Check it out here).


Step 11: Add Additional Quilting and Create Scalloped Edges
Once you have completed the appliqué, you can add some additional quilting.
For PinkBomb 88 I used my walking foot to measure a 1/4" curves around the outer circles. I repeated this about seven times to create a border around the appliqué. I used these quilting lines to cut out the scalloped "88" shape from the quilt top, but you can keep you wall quilt square, of course!

Step 12: Finish Edges by Using Bias Binding
Make or purchase some bias binding to finished the project's scalloped edges.

